| |
|
Click on a thumbnail picture below to see the full size version.
|
51 Entries.
|
|
Tuesday, January 28
|
View Page
|
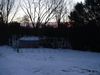 |
Nice Sunrise
It still may be early in the year, but soon pumpkin season will be upon us. This is where the planning time comes in, to help ensure that (most) everything is in place and ready to go when the time comes.
|
|
Ā
|
|
Saturday, March 29
|
View Page
|
 |
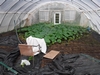
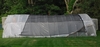
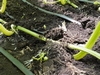
Initial Spring Time Work
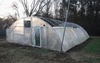
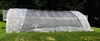
Some of the plastic is now up. Days that are low wind have been hard to find, so the plastic is being put up in small stages when there is a weather window of opportunity. In this image the plastic does show some of the dirt from storage, but after a few rain storms this should wash off.
Notice that there is no "roof" plastic. This is because instead of one large sheet three are used, two on each side and then one central "roof" plastic piece will be put on. However, this is the largest and most difficult so not only does the weather need to cooperate, but having access to a few extra hands is also welcomed. just in case😉
Also, behind the plastic that can be seen is insect netting so that when it gets hot out, the plastic can be taken down from the sides, to help air flow, but also still prevent insects from just flying into the planting area.
|
|
Ā
|
|
Saturday, March 29
|
View Page
|
 |
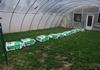
Spring Seed Starting Party!
This is always a great time to get to see many growers in the area and exchange patch growing supplies. Wallace WOW was in attendance and in the green trailer is some 0-0-50. Soon all of the other growers will be arriving and there is a before lunch talk planned with speaker Steve C. to recap his past season.
With any luck the seed to be grown this year should be arriving as well😉
|
|
Ā
|
|
Sunday, March 30
|
View Page
|
 |
Anchoring Side Plastic
Here is a little insight to help ensure the side plastic is secured well and also tight to reduce the amount of slack which will also reduce the chance of it tearing in the wind.
First there is a trenched dug into the soil and then the plastic is attached at the top (about 6-8ft. above the ground) to wiggle wire channel that is part of a purlin. Then the plastic is draped over the trench and *some* of the soil is added on top of the plastic as can be seen in the image. While an effort is made to keep the plastic tight, it rarely comes out perfect, but hold on for the key tip in the next post.
|
|
Ā
|
|
Sunday, March 30
|
View Page
|
 |
Tightening Plastic
With *some* of the soil added on the plastic the key part is now to pull up on the plastic. What is happening is the soil is self-centering on the plastic which will help ensure that it is tight to the hoops. While easier with two people, it can be done alone it may just take a few times to go up and down the side of the structure to ensure there is tension on the plastic.
Once the plastic is tight and looks good to go the next step is securing it...
|
|
Ā
|
|
Sunday, March 30
|
View Page
|
 |
Securing the Plastic
Here the tail end of the plastic is folded to fit into the trench and then the rest (majority) of the soil is placed on top. This helps to ensure it is well secured in place. Once it gets rained on the soil adds plenty of weight. The key is the self-centering of the plastic first and then securing it with this step.
|
|
Ā
|
|
Sunday, March 30
|
View Page
|
 |
"Roof" Plastic Installed
No images of the set-up process but the window of opportunity opened so the work was completed quickly and efficiently. Nice when a plant comes together (Thanks Nick!).
Still plenty of more things to do, but this is a sign that the season is about to officially begin!
|
|
Ā
|
|
Friday, April 4
|
View Page
|
 |
Amendment Line-Up
While the structure still needs some key components (shutter vents to be installed for one) the soil also needs some preparation work. While this may be early in the season, with the plastic cover the risk for flushing out any amendments is reduced so going in early is justified.
This area is about 32ft. x 40ft. with 30 cubic feet of Peat Moss being added along with 50lb of lime and 20 pounds of 0-0-50. This will be tilled in with the grass before applying OxiDate 5.0 as a drench followed by weed block. On top of this will be a smaller cold-frame (12ft. long x 8ft. wide) that the plants will go into "soon".
|
|
Ā
|
|
Thursday, April 10
|
View Page
|
 |
Seed Starting Day!
This is the seed selected for this year the 2154 Sperry '23 (F: 1904.4 Sperry x M: 2365 Wolf), It produced two impressive pumpkins last year one over 2,100 pounds by a new grower and the pumpkin had fantastic orange color. The other had some grower error, but the shape was very symmetrical and the grower spoke highly of the plant. It will be interesting to see what it will produce this year.
|
|
Ā
|
|
Saturday, April 12
|
View Page
|
 |
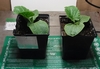
48-Hours Later There Are Roots!
Since only one plant will be grown two seeds were started and they are basically both nearly carbon copies of each other.
Note: Spoiler Alter- The one on the left is the "chosen one".
|
|
Ā
|
|
Monday, April 21
|
View Page
|
 |
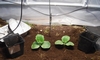
Planting Day
Both plants have been under some CMH (Ceramic Metal Halide) lights and have been growing well. Since they both look so good and there is no clear winner, they both will get planted to see if one takes the lead in the near future.
Note: Spoiler Alter- The one on the left is the "chosen one".
|
|
Ā
|
|
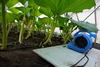
Monday, April 21
|
View Page
|
 |
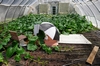
Planting Success
Both plants have made it safely to their new home and will be grown together until one needs to be culled. The plants are in a smaller cold frame that is in the larger structure. There are ceramic heat lamps around the plants that are controlled via a thermometer. In addition, there is another CMH light over them which the plants are accustom to growing under (in addition to the now added sunlight they will be receiving.
Below the ground there is a 40ft. soil heating cable (also controlled via a thermostat) to try and keep the root zone around 68F (20C). The black tubing in the background on the metal frame is rain-tubing that is used for CO2 delivery.
Note: Spoiler Alter- The one on the left is the "chosen one".
|
|
Ā
|
|
Sunday, May 11
|
View Page
|
 |
Sometimes the Plants Choose
While each of these plants has been very consistent, both have been left to grow with only some slight directing provided to keep them going in the same direction. It has been difficult to determine which plant is the better one. However, in this case the plants made the decision.
Note: Spoiler Alter- The one on the left is the "chosen one".
|
|
Ā
|
|
Sunday, May 11
|
View Page
|
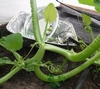 |
Kinked Main Vine
The plant on the right grew vertically for slightly longer than it should have and as a result the main vine has developed a kink in it that has also led to some splitting. While this looks bad upon a cut away dissection it is not as bad as it looks. However, when given the choice between a normally growing main vine and this one, there could have been issues with this going forward. So, this was the determining reason for this plant getting culled.
|
|
Ā
|
|
Sunday, May 11
|
View Page
|
 |
The Chosen 2154 Sperry '23 Plant
The process of culling the other plant is a simple cut at the soil line. This minimizes soil disturbance and will now provide extra room for the "chosen one" to freely expand.
Was the right decision made? It is impossible to tell, but in the end, this was the slightly better plant so now all of the attention can be focused on this plant going forward
|
|
Ā
|
|
Saturday, June 7
|
View Page
|
 |
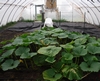
2154 Sperry '23 June 7th, 2025 Update
This shows what the plant looks like and early secondary vines will be terminated soon. Two "Henry Fans" (carpet/floor fans that were recommended by "Henry-the giant pumpkin grower" here in bigpumpkins.com) have been added to help keep air moving inside the structure. There is also CO2 being added so these fans help ensure an even mixing of CO2 and temperature in the growing area. These are only run during the day when air circulation is needed the most
|
|
Ā
|
|
Saturday, June 7
|
View Page
|
 |
2154 Sperry '23 June 7th, 2025 Update
The browning on the leaves is something that is typically not experienced with this set-up, as it is cold damage. The plant out grew its smaller inside structure and then there was an unexpected cold night. This is not frost damage, but simply cold damage that was likely more of a cold temperature shock to the plant as only leaves exposed to these conditions has the browning.
The damage pattern is also unique (but hard to see in the image) but it is portions of the plant that were outside of the secondary heating area of the two 315-watt CMH lights. In general, the damage is minimal, but does look a little scary at this point in the season
|
|
Ā
|
|
Thursday, June 12
|
View Page
|
 |
Getting 2670 Thompson Pollen (The Exchange Site)
Hillside Pizza sounds like a great place to eat, but this evening's goal was not food, but pumpkin pollen. Special thanks to "Hayden R." for some 2670 Thompson '24 (F: 2465.5 Sperry x M: 2560 Gienger) pollen.
While genetics on paper have been a staple breeding practice, to help speed up the selection process the goal is to match the "on paper" genetics, while also taking into consideration the plants performance during the season. The goal is to find the best of the best. While some plants that are known to be slow starters can complicate this idea.
However, an aggressive plant and pumpkin growth are the main goal with this theory to maximize growth potential. When a grower reports... "the 2670 Thompson which has been the best plant since day 1" this is the trait that would be great to breed into the next generation. Also just having the grower say "I like photographing this plant" tells the plant has generally good behavior and is problem free.
The 2670 Thompson is an unproven seed at this moment in time, but sometimes a calculated risk needs to be taken to push the genetics of the hobby forward. Only time will tell if this works out, but the hope is the research and work will pay off in the end.
Today is also another growers birthday so Happy Birthday GreenGene ;-) Today is typically measure day of the plants, but instead the priority was getting pollen.
|
|
Ā
|
|
Friday, June 13
|
View Page
|
 |
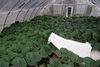
2154 Sperry '23: Pollination Day Plant View
The intended keeper is under the chair with the white sheet over it. The back-up female flower is closer to the main vine growing tip and is under a 5-gallon paint strainer bag to provide some protection and shade.
Overall, the plant timing is right about where it should be for pollination time as there are a few secondaries that have been recently terminated. What has made this year a little odd is with some colder than normal weather and frequent cloud cover some early secondary vines have decided to just stop growing randomly. While this may not hurt growth in the long run, there are some gap areas in the early portions of the plant.
|
|
Ā
|
|
Friday, June 13
|
View Page
|
 |
2154 Sperry '23 "Keeper" Female Flower
There is always a bit of an unknown factor before the flower opens. Questions like. how many lobes, are they symmetrical, are there seeds in the blossom, will it be deformed, will it open normally, and so on😉
However, seeing this very symmetrical 4-lobe female flower 22.5 feet out form the initial planting site are all parameters "in the zone". Being fortunate to have some 2670 Thompson pollen is only adding to the list of positives for this flower being the "keeper".
|
|
Ā
|
|
Friday, June 13
|
View Page
|
 |
2154 Sperry '23 "Keeper" Lobe Inspection
While not scientific, anything from 3 to 6 lobes is a good number. The symmetry of the lobes may have some impact on the symmetry of the final pumpkin, at least in my experiences. Seeing the lobes being very symmetrical, ideally increases the odds of the pumpkin being the same way. When breeding to push the limits a symmetrical shape should have improved consistent structure with the hopes of reducing the chance at a structural failure of the pumpkin itself.
|
|
Ā
|
|
Friday, June 13
|
View Page
|
 |
2670 Thompson '24 (F: 2465.5 Sperry x M: 2560 Gienger) Male Flowers
Driving to go get pollen is something that has become common for me over the last few years as growing one plant limits the ability to outcross. However, growers have been very generous in the past and it continues into this year with providing male flowers. It can be a bit of a challenge to coordinate the exact day the flower will open, but the day before the female flower typically starts to get some color and at this point a panic call/email is made to see if male flowers are available.
A self-cross is not a bad cross, but trying to breed two winners together is the goal of this approach. Many thanks to "Hayden R" for allowing me to get some pollen from his plant. The cross is great for this unproven seed, and the plant habit has been wonderful so hopefully these good genes can be carried over into the next generation.
|
|
Ā
|
|
Friday, June 13
|
View Page
|
 |
Pollination Completed: F: 2154 Sperry '23 x M: 2670 Thompson '24 (Thanks Hayden!)
Even though one male flower has more than enough pollen for a successful pollination, three were used since they were available. It is important to remember that pollination is an accidental process so think like a bee which their goal is to get nectar (and not transfer pollen). So, this is why they tend to be in the bottom of the flower as this is where the nectar is. The transfer of pollen to the stigma of the female flower is an accidentally process. Hard to believe that something so important happens by accident!
So, when pollinating be sure to focus on the lower portions of the flower and not necessarily the obvious portions closest to you.
|
|
Ā
|
|
Sunday, June 15
|
View Page
|
 |
Anthesis Application 48-Hours Post Pollination
This is a critical time in regards to cell division so the hormone application "Anthesis" has been made in hopes of prolonging the duration while also increasing the rate of cell division. There are two hormones in this mix as each one has a specific purpose and concentration that is needed. This application may result in the pumpkin being smaller in the short term, but the goal is for longer term gains.
The blue cup is placed over the flower the night before it opens for pollination and remains on until this day. The cup helps ensure over-spray does not come in contact with the flower petals. The goal is to only make the water mist application to the fruit itself as this is where the targeted cells are. *If it is applied to the petals is seems like they may degrade a little faster than normal. Not an issue, but the cup is put in place any way so why not use it for a duel purpose.
|
|
Ā
|
|
Wednesday, June 18
|
View Page
|
 |
Day 5: F: 2154 Sperry '23 x M: 2670 Thompson '24
Nothing special about this day other than it is the day of "touch down". Yesterday afternoon/evening the goal was to set-up the mill fabric, plywood, fan and sonicators. The idea is to get everything in place early so there is minimal disturbance to the area as the pumpkin gets larger.
The pumpkin at this stage seems to be made of "hot butter" so it is very susceptible to physical damage which is why the goal is to not come in contact with it unless it is absolutely necessary. A helping hand to push the plywood and mill fabric combination is welcomed as there is a lot to keep track of to prevent unwanted damage.
Even though the pumpkin can still abort, it is slowly growing, but the key is that it still has its youthful shine to the skin. The back-up flower will still be pollinated just in case, but hopefully this is the one that will be the final "keeper".
|
|
Ā
|
|
Wednesday, June 18
|
View Page
|
 |
Day 5: F: 2154 Sperry '23 x M: 2670 Thompson '24
Here is a different view of the pumpkin, fan and sonicator set-up. The main vine has a slight bend to it, but a few nodes down is the back-up so this bend should be sufficient to keep it away from the pumpkin. Also, since everything is on the double layer of mill fabric adjustments will hopefully be easy to make as the season progresses if necessary.
|
|
Ā
|
|
Wednesday, June 18
|
View Page
|
 |
Day 5: F: 2154 Sperry '23 x M: 2670 Thompson '24
This shows the plant and set-up from a wider angle. Under the chair with the white sheet is the pumpkin with the small desk fan and sonicator to discourage mice and chipmunks from the area. Then there are two layers of mill fabric, Š" plywood followed by two more layers of mill fabric. The reason for the double layer times two is to help make early adjustments easier by one person. Ideally the pumpkin is place in the perfect position, but rarely does this perfect positioning hold as the pumpkin grows. So, these help the pumpkin move with the least amount of physical force possible.
What you will notice is a painted white piece of plywood behind the pumpkin set-up. This matches the plywood that is between the layers of mill fabric as the white paint helps reduce some of the moisture absorption. However, there is no mill fabric underneath or on top of this piece. The reason for this is to provide easy grower access with a reduce chance of slipping as two pieces of mill fabric can be very low friction.
The hope is the pumpkin will grow onto this section and if needed mill fabric can be easily added, but at this point, safer grower access is preferred.
|
|
Ā
|
|
Sunday, June 22
|
View Page
|
 |
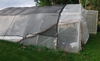
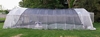
Preparing for Extreme Heat
In about two days record highs are predicted with actual temperatures possible reaching 100-degrees F (38 degrees C)and added humidity to make it feel like 110+F (or 43+C). So, since it should only be about 90 F (or 32 C) some modifications have been made the help prepare the plants for the heat.
This shows the full structure, but the goal is to focus on the lower right-hand side. Here the plastic has been lifted and pinned in this corner. The goal is to allow more air circulation and simply increase the volume of air that can enter the hoop house.
The shade netting is 30% and this helps to reduce the over stress on the plant from direct sunlight and additional heat.
|
|
Ā
|
|
Sunday, June 22
|
View Page
|
 |
Closer Look
Here the end that is lifted can be seen in better detail. The actual plant may seem a bit foggy, and this is because there is insect netting behind the plastic so when it is lifted there is still a physical screen in place. This allows air to come in, but limits the chance that unwanted insects can enter. To help this air flow process a blue "Henry" (Carpet) Fan can be seen. This will help direct outside air into the hoop house and under the leaf canopy.
This is the basic set-up when the temperature is predicted to be 90-F (32-C) or greater. However, when the 95+F (35+C) with full sun is predicted there is another set-up that will be shown in a later posting. Roll-up sides would be much easier, but this set-up has proven to be effective, it just takes a little setting up to do.
|
|
Ā
|
|
Sunday, June 22
|
View Page
|
 |
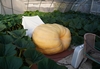
Day 9: F: 2154 Sperry '23 (x M: 2670 Thompson '24)
The pumpkin still has a nice shine to it and it is growing. While the growth may be slow, this is in-part to be expected, the key is the shine and some growth that is occurring. The preventive measures with the plywood, mill fabric, sonicators, fan, chair and white sheet are all in place in hopes this is the final "keeper".
|
|
Ā
|
|
Monday, June 23
|
View Page
|
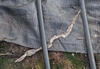 |
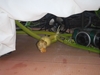
Snake Skin
It seems every year early in the season the warmth of the hoop house structure attracts at least one snake. While he was not seen much this year, seeing the skin left behind indicates he is in the area and is actively growing. Always nice to have additional help in the patch with pest control.
|
|
Ā
|
|
Monday, June 23
|
View Page
|
 |
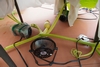
"Henry" Carpet Fan
This shows the placement of the under-canopy fan to ensure good air circulation. This is run mainly during the day to keep air moving and to ideally draw in cooler air from the outside and force it under the leaves. It may be hard to tell but this is located near the corner of the structure and it is set on about a 45-degree angle toward the middle of the structure for maximum effectiveness.
|
|
Ā
|
|
Monday, June 23
|
View Page
|
 |
Hot Weather Set-up
The side walls of the hoop house have been taken down, shade fabric is up and umbrellas are set around the pumpkin and main vine. The CO2 system has been temporarily shut down now that the sides are open because increased outside air circulation will be more important over the next few days.
Time will tell if these modifications help or where the weak points in the system exist.
|
|
Ā
|
|
Monday, June 23
|
View Page
|
 |
Pumpkin Day 10: F: 2154 Sperry '23 General Plant Overview
The plant is filling its allocated area and looks great. However, the more important aspect is the timing of the growth in relation to the area and the pumpkin stage of development. These two factors are probably more important than the "date". The goal is to have the plant fully filled in by time the pumpkin is around 25 days old. What can make this a challenge to predict is early on the plant is slowing growing (probably focusing more on root development) and then there is the exponential growth of the plant, but once the pumpkin starts growing there can be a slowdown in growth.
Supplementing with CO2 helps all aspects of the plant growth, but through research on pumpkins myself the carbon dioxide supplementation does not help directly with pumpkin growth only plant growth. This is why the CO2 enrichment is run until the pumpkin is about 20-30 days old to help it fill in the area.
However, the real reason for this picture is that this is the morning before the very hot weather. So, consider this the before picture to see how the plant will fair in the extreme heat.
|
|
Ā
|
|
Monday, June 23
|
View Page
|
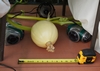 |
Day 10: F: 2154 Sperry '23 (x M: 2670 Thompson '24)
Many growers like to measure their pumpkins on day 10, but I do not do this for two main reasons.
1.) It does not really indicate that much, if the pumpkin has a nice shine to it and seems to be growing that is all I need. The Anthesis application can hinder early growth and day 10 numbers are very variable so why collect the data?
2.) At this stage the pumpkin skin is very soft and subject to damage. Any small damage now will only become a bigger spot later as the pumpkin growers so why take the risk?
Often growers put a soda or pop can next to the pumpkin for size comparison, but while I do not measure the actual pumpkin here is an actual measured scale so you can know exactly how big it is. if you care about this more than me😉
|
|
Ā
|
|
Tuesday, June 24
|
View Page
|
 |
Hot Weather
According to the official states weather center the high temperature was 99-F (37-C). However, this is the thermometer in the shade reading just a touch over 100-F (38-C). In addition to the actual temperature, the dew point is hovering around 70 so the feels-like temperature is about 110-F (43-C).
The side wall plastic has been removed and the 30% shade netting in place.
This weather is unusual for this area in general and especially in June. Now, it is off to see how the plant is doing in these conditions.
|
|
Ā
|
|
Tuesday, June 24
|
View Page
|
 |
Overall Hoop-House Picture
This is the time of greatest stress around 1pm, so the goal is to see everything in the "worse case" to best evaluate weaknesses in the system. This is a good time to do scouting to see the plants, even though it can be a challenge for the growers/inspectors.
|
|
Ā
|
|
Tuesday, June 24
|
View Page
|
 |
2154 Sperry '23 General Plant Overview at 1pm at 100-F (38-C)
Overall, the plant looks very good considering the extreme heat. There is a chair with a white sheet over the pumpkin (day 11) and the extra addition of an umbrella to reduce the direct sun rays even more in the area of the pumpkin. The hope is that these preventive measures will reduce the chance of the pumpkin aborting.
|
|
Ā
|
|
Tuesday, June 24
|
View Page
|
 |
2154 Sperry '23 Main Vine
Another umbrella has been set-up over the main vine that is nearing the end of the side wall of the structure after being turned 90-degrees. The goal is to prevent it from burning and prematurely ending. It may be terminated in the future, but it is currently not in the correct spot for termination.
|
|
Ā
|
|
Tuesday, June 24
|
View Page
|
 |
2154 Sperry '23 Plant Overview at 1pm at 100-F (38-C)
Without the title it would be hard to tell that the plant is experiencing the extreme heat that it is. This shows that all of the preparation work set the plant up well to handle these unusual environmental conditions. However, while the exposure to elevated temperatures did help there is another important factor to consider.
|
|
Ā
|
|
Tuesday, June 24
|
View Page
|
 |
2154 Sperry '23 Aggressive Roots
This plant has been great about getting the top root to curl over and set into the soil. Meanwhile, the bottom root has consistently exploded with growth. The combination of these two root systems has allowed for efficient water uptake and has probably helped the plant maintain its turgor pressure to prevent it from wiling.
The use of CloneX gel is very helpful in this process to help increase the consistency of getting the top root and also ensuring the multiple branch points for the bottom root.
|
|
Ā
|
|
Tuesday, June 24
|
View Page
|
 |
2154 Sperry '23 Aggressive Roots at Multiple Nodes
To show that the last image was not just a single selected root explosion this shows three different nodes with the same consistent and aggressive rooting. This is all part of building up a well-established plant to be able to push a pumpkin for the remainder of the season. Time will tell if this plan will come together, but at least for now this is hopefully increasing the odds of success.
|
|
Ā
|
|
Thursday, July 3
|
View Page
|
 |
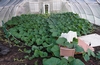
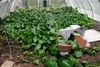
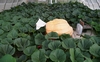
2154 Sperry '23 Plant Overview
The plant has basically filled the allowed growing area which is about 32ft. wide and 40ft. long. The oldest leaves are by the door in the image and other than the early season cold damage there does not seem to be any advanced aging. Things are set-up and ready for the rest of the season with the plant pruned and the shade structure over the selected pumpkin.
|
|
Ā
|
|
Thursday, July 3
|
View Page
|
 |
Day 20: F: 2154 Sperry '23 (x M: 2670 Thompson '24)
22.5ft. out on main vine
OTT = 182"
Est. Weight = 140 pounds
It is still early in the season, but so far the shape is staying very symmetrical and the pumpkin still has a nice shine to it. A box fan has been added at the blossom end and an extra sonicator to ensure full coverage around the entire pumpkin to deter mice from investigating this area.
|
|
Ā
|
|
Sunday, July 13
|
View Page
|
 |
2154 Sperry '23 Plant Has Filled the Area
Most of the vines are now terminated with just the main and one or two left to run to fill in the limited space that is left in the edges and corners of the structure. There are still some random tertiaries that rise above the canopy every once and awhile that are removed once seen.
Plant health is looking great in hopes that this will be able to carry the pumpkin growth for the full extent of the growing season.
|
|
Ā
|
|
Sunday, July 13
|
View Page
|
 |
Main Vine Space Looks Good, but Could be Better on the 2154 Sperry '23
In the image the spacing and position look good, but there is some evidence that there could be some potential future issues and the pumpkin is easier to move now so this week it will be pulled back about 4 to 6 inches. The vines has no tension on it vertically, but the pumpkin has taken out all of the horizontal slack. With the straight stem this could potentially pinch the vine in a "V" latter in the season.
With the goal to be preventative, a little moving now, should help ensure it is good to go for the rest of the season.
|
|
Ā
|
|
Sunday, July 13
|
View Page
|
 |
Day 30: F: 2154 Sperry '23 (x M: 2670 Thompson '24)
OTT = 291.5"
Est. Weight = 546.5 pounds
Avg. over last 10 days = 40.65 pounds per day
The plant looks great, the pumpkin is growing, what more can a grower wish for. The hope is that these conditions simply continue. Shape at this point looks good and now the goal is to keep up vigilant plant and pumpkin scouting while trying to keep conditions as consistent as possible. The hope is that all of the previous preparation work will pay off, but with giant pumpkins. you never know so you have to enjoy every day of the process.
|
|
Ā
|
|
Tuesday, July 22
|
View Page
|
 |
RIP Dan Boyce
Dan Boyce, a beloved member of the giant pumpkin community and a man of the land, passed away recently, leaving behind a legacy rooted in nature, perseverance, and passion.
Best known for growing an awe-inspiring 2,017.5-pound pumpkin, a true testament to his dedication and skill, Dan was a masterful pumpkin grower whose green thumb was rivaled only by the size of his harvests. His prized pumpkin wasn't just a local legend; it symbolized his unwavering patience and love for nature.
When not tending to his garden, Dan could be found casting lines into quiet waters or tracking through the woods. An avid fisherman and hunter, he embraced the outdoors with reverence and joy. Whether it was the thrill of the catch or the stillness of the forest, Dan found peace in nature.
He was a genuine friend who will be remembered for his warmth, humble spirit, and the stories he shared.
|
|
Ā
|
|
Wednesday, July 23
|
View Page
|
 |
2154 Sperry '23 Plant Health
Overall, the plant continues to look great. The goal has been to maintain careful monitoring to try and catch any potential issues early and get away from a regular schedule as the less products applied on the leaves the better for long term plant health. It is important that when you do spray you spray with a specific targeted purpose. Also, if you are combating the same problem over a period of time, be sure to rotate chemical classes to reduce the chance of building up resistance to the target pest.
|
|
Ā
|
|
Wednesday, July 23
|
View Page
|
 |
Day 40: F: 2154 Sperry '23 (x M: 2670 Thompson '24)
OTT = 349"
Est. Weight = 920 pounds
Avg. over last 10 days = 37.35 pounds per day
The pumpkin is favoring a long shape with a sunken in blossom end, with some stripes developing along the ribs. Looking at the above stats many would not complain, but unfortunately, this is a bit concerning to me. The day 30-40 days of a pumpkins life the growth should be ramping up and this rate of 37.35lb per day is actually down more than 3 pounds a day during a critical time the rate per day should be increasing. The plant and pumpkin all look great, but it is the rate of growth to days old that is the concern. Time will tell how this pans out over the next 10 days, but to quote Star Wars.
"I have a bad feeling about this."
|
|
Ā
|
|
Saturday, August 2
|
View Page
|
 |
Day 50: F: 2154 Sperry '23 (x M: 2670 Thompson '24)
OTT = 384"
Est. Weight = 1,213 pounds
Avg. over last 10 days = 29.3 pounds per day
Plant health is still going strong as August starts. As expected from the last measurement the growth rate has continued to slow down, but it is still growing which is good news. The "New Hope" is that it will continue to grow for many days at a consistent rate to reduce the chance of splitting. While the pace may not be what I have had in the past, if the pumpkin can hold together, it has a chance at a new personal best which is all any grower can ask for.
|
|
Ā
|
|
|